til
signing my email with s/mime
Note: Even though I learnt this back in 2025, I only got around to writing it up now in 2026. I needed to renew the
cert, and forgot how. So like if my past self wrote this, my future self (now current self) would have thanked me. lol
rip.
For the funnsies I wanted to sign my email.
Email already has things like DKIM/SPF/DMARC, which help mail servers check that an email claiming to come from a domain
was actually sent through authorised mail servers and wasn’t tampered with along the way.
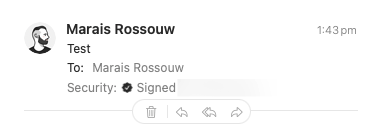
S/MIME is the extra little nerd badge on top. It signs emails as me, so your mail client can show something like “this
sender has verified their email address”.
1. Getting a cert
You need to get an S/MIME certificate from a CA (Certificate Authority). This was all new to me, see I grew up in the
era of free/automatic SSL certs. HTTPS is just something I don’t really think about. I either use
Let’s Encrypt, or get one from Cloudflare for free. So I was surprised to find out that
S/MIME certs aren’t free and automatic. I had to buy one from a CA.
Thankfully, they’re inexpensive.
They’re available from pretty much any CA that sells SSL certs, like Sectigo,
DigiCert, and so on. People usually prefer one CA over another for various reasons. I could
not quite figure out the differences, so I went with the cheapest one I could find at the time, since I just wanted to
try it out. Which was SSLTrust, they gave me a DigiCert signing cert for $27 AUD, and it
worked!
Edit: I have since renewed with Sectigo, which was a bit more expensive. My employer (GitHub) uses Sectigo for their
SSL certs, so I guess that gives me some confidence in them. I also had some issues with SSLTrust when I tried to
renew. The portal is very confusing which made me switch to Sectigo.
2. Issuing it
Once I bought the “cert”, you now need to issue it.
Generate a CSR (Certificate Signing Request) on your machine, and submit it to the provider.
openssl ecparam -name prime256v1 -genkey -noout -out PRIVATEKEY.key
openssl req -new -key PRIVATEKEY.key -out CSR.csr
openssl ecparam -name prime256v1 -genkey -noout -out PRIVATEKEY.key
openssl req -new -key PRIVATEKEY.key -out CSR.csr
When renewing the cert, you can use the same private key. Unless it’s compromised, I cannot see a reason not to. But
make sure to securely back it up.
Note: If none of the CSR details (like Country, Common Name, etc) has changed since you last issued, you can also skip
this step entirely, and just reuse the same CSR.
- Upload that CSR to the provider. Typically they’ll send you a verification email, which usually takes about a minute.
- Download the cert! 🎉
3. Bundling into a .pfx
What you get from the provider are usually two .crt files, the CA bundle (which links my cert back to the CA), and my
cert.
But to use it on your devices, you need a single file containing the private key, the cert, and the CA bundle. PKCS#12
is a standard format for bundling these together.
openssl pkcs12 -export \
  -out email.pfx \
  -inkey PRIVATEKEY.key \
  -in cert.crt \
  -certfile cert_ca_bundle.crt
openssl pkcs12 -export \
  -out email.pfx \
  -inkey PRIVATEKEY.key \
  -in cert.crt \
  -certfile cert_ca_bundle.crt
Important: give it an export password, iPhones require it.
4. Installing it
You’ll need to install this .pfx file on every device you want to sign email on.
Since the .pfx file contains your private key, you should be careful about how you transfer it. And once you’re done,
delete it. I keep mine stored in my password manager, so I can easily download it again if I need to install it on a new
device.
You could also just re-build the .pfx file from above when you need it again, but I find it easier to keep the .pfx
file around.
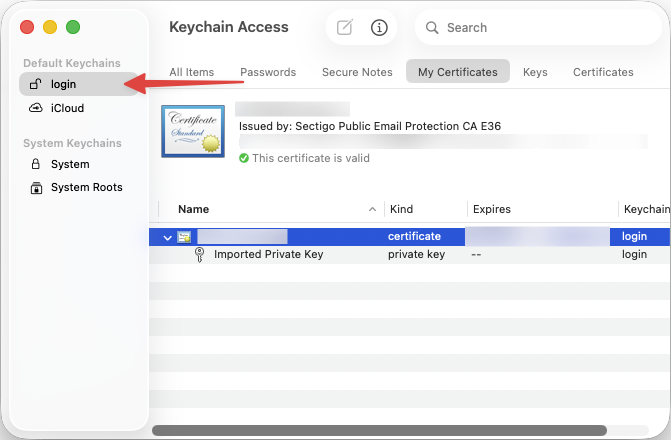
Mac
It’s as simple as double-clicking the .pfx file to add it to your keychain. You need to select the “login” keychain,
trying to add it to the “iCloud” keychain fails with a very unhelpful error message.
iPhone
You need to get that .pfx file onto your phone somehow. I just AirDropped it to myself, but you could also upload it
to iCloud Drive and open it from there.
- Open the
.pfx file on your iPhone. It should prompt you to install it. - Navigate to Settings > General > VPN & Device Management, and under “Downloaded Profile” you should see the profile
you just installed. Tap on it, and install the profile.
- And finally, go to Settings > Mail > Accounts, select the email account you want to sign with. Find Security > Sign
and Encryption, and turn on S/MIME > Sign.